
Environment Setup on Ubuntu#
Caution
This project is under active development. The information provided here is subject to change.
Update the operating system:
sudo apt update
Install make, binutils and sdcc:
sudo apt install make
sudo apt install binutils
sudo apt install sdcc
sudo apt install python3-usb
Linux Configuration for USB#
Create a new file:
sudo nano /etc/udev/rules.d/99-ch55x.rules
Add the following content:
SUBSYSTEM=="usb", ATTR{idVendor}=="4348", ATTR{idProduct}=="55e0", MODE="0666"
update the rules:
sudo udevadm control --reload-rules
sudo udevadm trigger
Clone the SDK repository with the examples:
git clone git@github.com:UNIT-Electronics-MX/unit_ch55x_sdk.git
Navigate to the path:
cd unit_ch55x_sdk/examples/blink
Execute the command:
make help
You will see:
Use the following commands:
make all     compile, build, and keep all files
make hex     compile and build blink.hex
make bin     compile and build blink.bin
make clean   remove all build files
Connect a device with the BOOT button pressed:
lsusb
The device will be shown with this description:
pc@LAPTOP:~$ lsusb
Bus 002 Device 001: ID 1d6b:0003 Linux Foundation 3.0 root hub
Bus 001 Device 002: ID 4348:55e0 WinChipHead
Bus 001 Device 001: ID 1d6b:0002 Linux Foundation 2.0 root hub
Compile the code:
make bin
Flash the code, remember to change the device path:
sudo python3 ../../tools/chprog.py main.bin
Success:
pc@LAPTOP:~$ sudo python3 ../../tools/chprog.py main.bin
[sudo] password for pc:
FOUND: CH552 with bootloader v2.4.0.
Erasing chip ...
Flashing main.bin to CH552 ...
SUCCESS: 374 bytes written.
Verifying ...
SUCCESS: 374 bytes verified.
DONE.
Note
chprog.py is a python script that allows you to flash the code to the device.
Compile and Flash CH55x with SDCC#
Running a Program#
To execute the program, open a Bash terminal or Git Bash terminal on Windows. Follow these steps to clone the SDK repository, navigate to the Blink example, and compile the project.
Clone the SDK Repository
Begin by cloning the SDK repository which contains the examples. Open your bash terminal and execute the following command:
git clone git@github.com:UNIT-Electronics-MX/unit_ch55x_sdk.git
Navigate to the Example Path
Once the repository is cloned, navigate to the Blink example:
cd unit_ch55x_sdk/examples/blink
Connect the Device
Connect your CH55x device to your computer. Ensure that you press and hold the BOOT button while connecting the device. This is essential for the device to enter programming mode.
Compile the Project
To compile the project and generate the necessary files, execute the following command in your terminal:
make allThis command will compile the project, resulting in the generation of files with various extensions necessary for flashing the microcontroller.
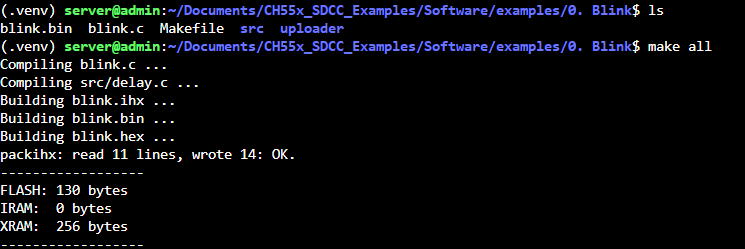
Fig. 3 Compilation output files#
Install pyusb#
pyusb is a Python module necessary for flashing the CH55x microcontroller. To install pyusb, follow these steps:
Install pyusb on using pip
python3 -m pip install pyusb
Then verify the installation
python3 -m pip show pyusb
For Windows, you can use the following command:
pip install pyusb
Error with pip#
If you encounter this error, we recommend installing the Python environment:
sudo apt install python3-venv
Create an environment:
python3 -m venv .venv
Activate the environment:
source .venv/bin/activate
And install pyusb:
pip install pyusb