Communication Serial CDC#
Cocket Nova development board is compatible with the USB CDC (Communication Device Class) protocol. This allows the Cocket Nova to be used as a virtual serial port. The CDC protocol is supported by most operating systems, including Windows, Linux, and macOS.
Note
The CDC protocol is implemented using the USB peripheral of the microcontroller. The USB peripheral is configured as a virtual serial port, which allows the microcontroller to communicate with the host computer using the USB cable.
The following code snippet shows how to configure the USB peripheral as a virtual serial port and this method only recive information from the host
void main(void) {
// Setup
CLK_config();                           // configure system clock
DLY_ms(5);                              // wait for clock to stabilize
CDC_init();                             // init USB CDC

// Loop
while(1) {
    if(CDC_available()) {                 // something coming in?
    char c = CDC_read();                // read the character ...
    CDC_writeflush(c);                  // ... and send it back
    }
}
}
USB CDC Serial Configuration for CH55x Microcontrollers#
USB Passthrough for CH55x Microcontrollers#
This project implements a simple USB passthrough functionality using CH551, CH552, or CH554 microcontrollers. The microcontroller acts as a USB Communication Device Class (CDC), enabling serial communication over USB. Data received via USB is immediately sent back to the host computer. Wiring
Connect the CH55x development board to your PC via USB. It should be automatically detected as a CDC device. Compilation Instructions:
Chip: CH551, CH552, or CH554
Clock: 16 MHz internal
Adjust firmware parameters in src/config.h if necessary.
Ensure SDCC toolchain and Python3 with PyUSB are installed.
Press the BOOT button on the board and keep it pressed while connecting it via USB to your PC.
Run make flash immediately afterwards to flash the firmware.
For compilation using Arduino IDE, refer to instructions in the .ino file.
USB CDC Serial to UART Bridge for CH55x Microcontrollers#
This project implements a USB CDC to UART bridge functionality using ch552. The microcontroller acts as a USB Communication Device Class (CDC), allowing serial communication over USB. Data received via USB is sent to the UART interface and vice versa.
// Prototypes for used interrupts
void USB_interrupt(void);
void USB_ISR(void) __interrupt(INT_NO_USB) {
USB_interrupt();
}

void UART_interrupt(void);
void UART_ISR(void) __interrupt(INT_NO_UART0) {
UART_interrupt();
}
// ===================================================================================
// Main Function
// ===================================================================================
void main(void) {
// Setup
CLK_config();                             // configure system clock
DLY_ms(10);                               // wait for clock to settle
UART_init();                              // init UART
CDC_init();                               // init virtual COM

// Loop
while(1) {
    // Handle virtual COM
    if(CDC_available() && UART_ready()) UART_write(CDC_read());
    if(UART_available() && CDC_getDTR()) {
    while(UART_available()) CDC_write(UART_read());
    CDC_flush();
    }
}
}
USB CDC PWM Controller for CH55x Microcontrollers#
This project implements a USB CDC controlled PWM functionality using CH551, CH552, or CH554 microcontrollers. The microcontroller acts as a USB Communication Device Class (CDC), allowing serial communication over USB. Data received via USB is used to set the PWM value (0-255). Wiring
Connect the CH55x development board to your PC via USB. It should be automatically detected as a CDC device. Compilation Instructions:
Chip: CH551, CH552, or CH554
Clock: 16 MHz internal
Adjust firmware parameters in src/config.h if necessary.
Ensure SDCC toolchain and Python3 with PyUSB are installed.
Press the BOOT button on the board and keep it pressed while connecting it via USB to your PC.
Run make flash immediately afterwards to flash the firmware.
For compilation using Arduino IDE, refer to instructions in the .ino file.
Linux Configuration for USB CDC Devices#
To configure permissions for USB CDC devices (/dev/ttyACM0), follow these steps:
Create a new udev rule file:
sudo nano /etc/udev/rules.d/99-custom-usb.rules
Add the following rule to the file (replace idVendor and idProduct with your device’s actual IDs):
SUBSYSTEM=="tty", ATTRS{idVendor}=="1209", ATTRS{idProduct}=="27dd", GROUP="dialout", MODE="0666"
Save the file (Ctrl + O in nano, then Enter) and exit nano (Ctrl + X).
Reload udev rules for changes to take effect:
sudo udevadm control --reload-rules
Example Commands for Serial Communication#
Send data to USB device:
echo -e 'Hello World!\n' > /dev/ttyACM0
Read data from USB device:
cat /dev/ttyACM0
These commands allow you to interact with USB CDC devices connected to your Linux system. Adjust the device path (/dev/ttyACM0) as per your setup.
Windows Configuration for USB CDC Devices#
To configure permissions for USB CDC devices in Windows, follow these steps:
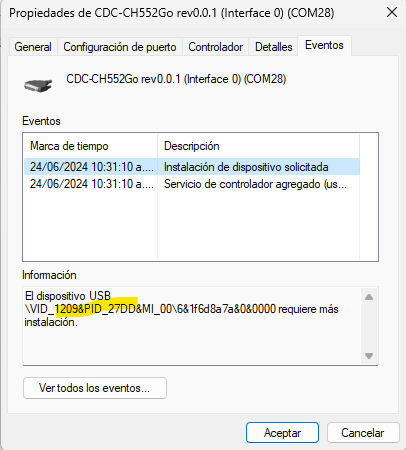
Identify the device’s COM port number in Device Manager.

Fig. 17 CDC Serial Device Manager#
Right-click on the device and select Properties.
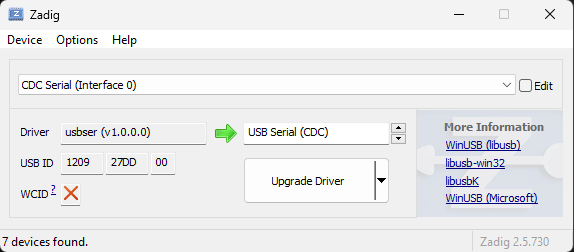
Open Zadig.
Go to Options > List All Devices.
Select the device from the drop-down list.

Fig. 18 Zadig CDC Device Selection#
