C++ Usage#
The supports for module with c++ are the same as the c language, but with the addition of the c++ features.
Installation#
To install the library, download the library from the link above and add it to the Arduino IDE. To add the library to the Arduino IDE, follow the steps below:
Open the Arduino IDE.
Install the available version of Adafruit MAX1704X.
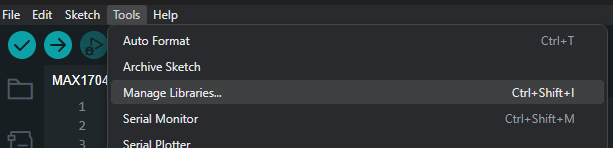
Fig. 9 Manager Libraries#

Fig. 10 Install Library Adafruit MAX1704X#
Note
It is advised to employ the DualMCU to utilize connectors with the QWIIC method. The implementation code is designed for this board; however, it may be altered to accommodate other compatible boards.
Copy the example code below and paste it into the Arduino IDE.
#include "Adafruit_MAX1704X.h"
Adafruit_MAX17048 maxlipo;
void setup() {
Serial.begin(115200);
while (!Serial) delay(10); // wait until serial monitor opens
Serial.println(F("\nAdafruit MAX17048 simple demo"));
if (!maxlipo.begin()) {
Serial.println(F("Couldnt find Adafruit MAX17048?\nMake sure a battery is plugged in!"));
while (1) delay(10);
}
Serial.print(F("Found MAX17048"));
Serial.print(F(" with Chip ID: 0x"));
Serial.println(maxlipo.getChipID(), HEX);
}
void loop() {
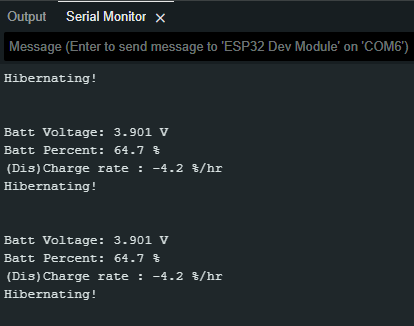
Serial.print(F("Batt Voltage: ")); Serial.print(maxlipo.cellVoltage(), 3); Serial.println(" V");
Serial.print(F("Batt Percent: ")); Serial.print(maxlipo.cellPercent(), 1); Serial.println(" %");
Serial.println();
delay(2000); // dont query too often!
}
Compile and upload the code to the board.
Acknowledgment#
It should be noted that Adafruit is the creator of the library, and that UNIT-Electronics did not create it in-house. We would like to express our appreciation to Adafruit for their efforts, as well as to the open-source community for their ongoing support in the use and growth of this library through their contributions.